kind:Kubernetes in Docker,单机运行 Kubernetes 群集的最佳方案

Posted by sysin on 2021-04-28
Estimated Reading Time 23 Minutes
Words 4.8k In Total
更新日期:Wed Apr 28 2021 15:17:40 GMT+0800,阅读量:

请访问原文链接:kind:Kubernetes in Docker,单机运行 Kubernetes 群集的最佳方案,查看最新版。原创作品,转载请保留出处。

作者主页:sysin.org


无耻抄袭者 Yu Tao,请立遁!!!

2021.04.28 更新,kind 更新到 v0.10.0,主要是新增对 Kubernetes v1.20 的支持,详见 Github Release

是否没有足够的机器运行 Kubernetes 测试环境,个人电脑配置不高的话,运行多个节点的虚拟化有点力不从心,国内公有云主机一般不支持嵌套虚拟化,一套 3M+3N 的群集环境成本太高。VMware Fusion 12.0 发布,将 Kind 带入了我们的视野,这是 Google 官方的一个工具,可能是在单机运行 Kubernetes 群集的最佳方案。笔者在一台 1C 2G 的公有云虚机上运行 Kind,虽然计算资源有限,也可以完成一般的测试。

阿里云或者腾讯云购买一台不到 100 元一年的入门云主机来运行 Kubernetes 群集,还可以将应用直接发布到互联网,开发测试非常方便。

1. 简介

kind 是 Kubernetes in Docker 的简写,是一个使用 Docker 容器作为 Nodes,在本地创建和运行 Kubernetes 群集的工具。适用于在本机创建 Kubernetes 群集环境进行开发和测试。

官网:https://kind.sigs.k8s.io/

kind 由以下组件构成:

kind 使用 kubeadm 创建和启动群集节点。

kind 使用 containerd 作为容器运行时,所以弃用 Dockershim 对 kind 没有影响。🐳
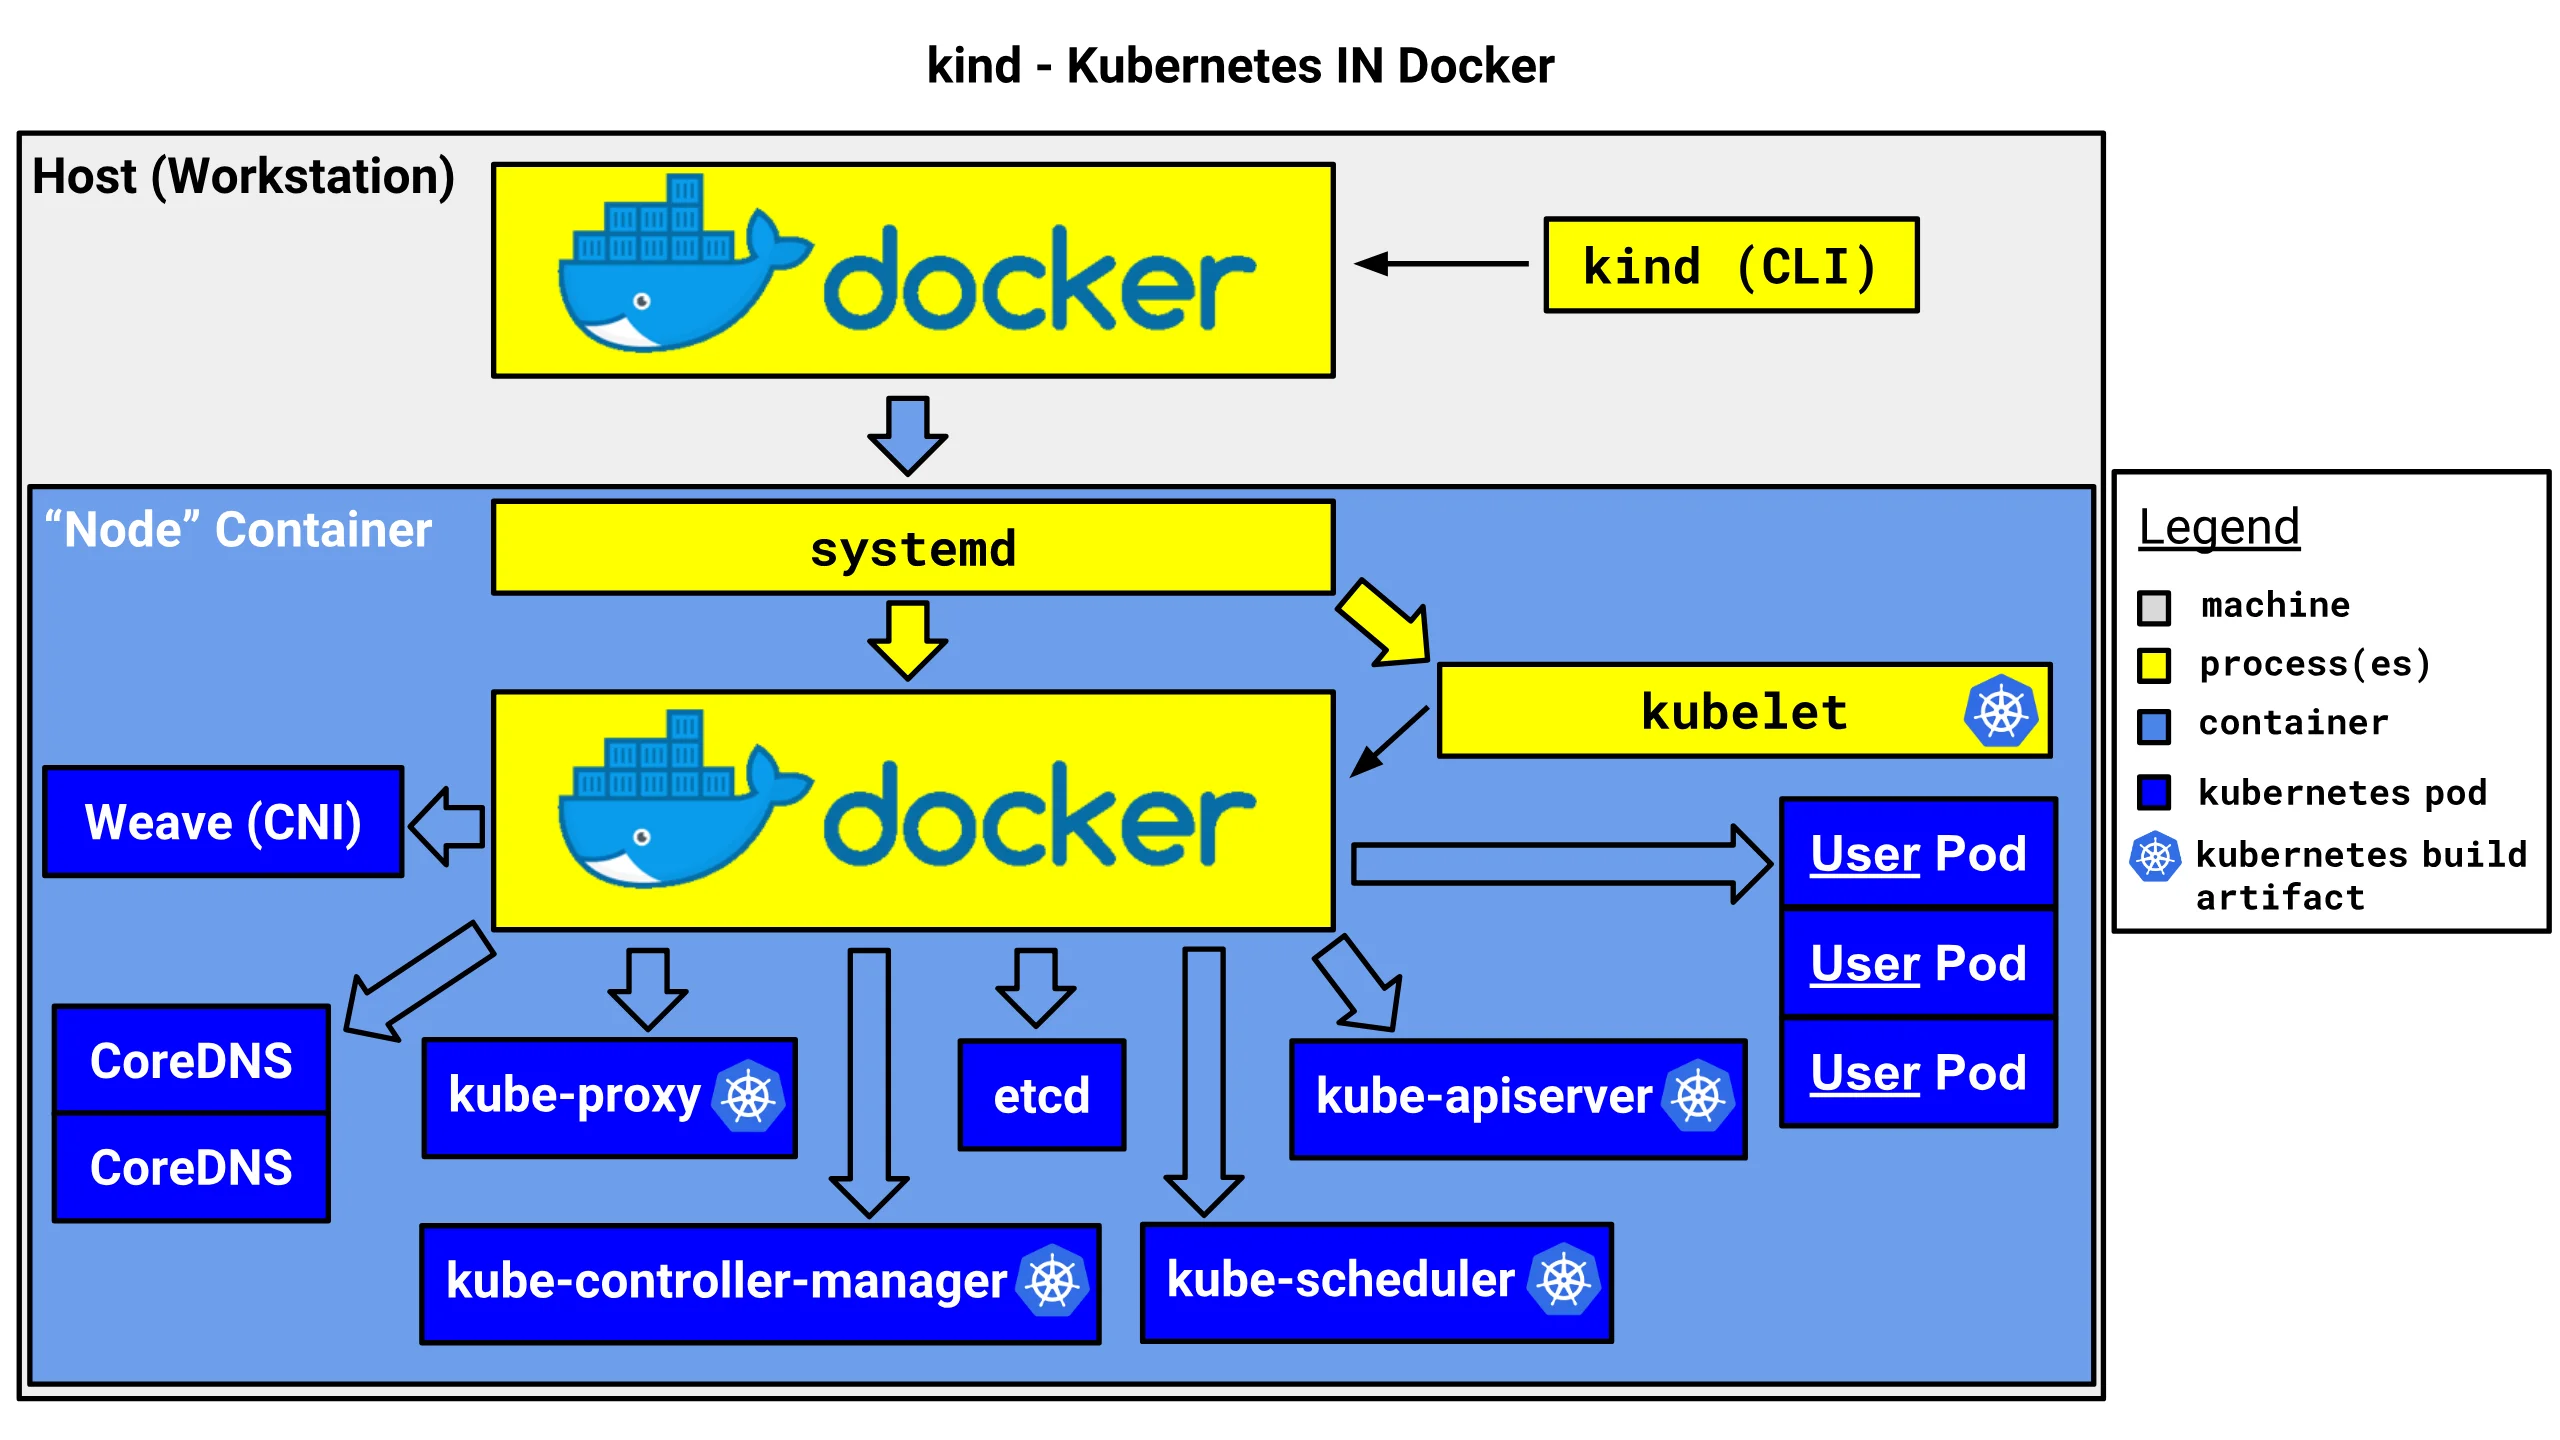
2. kind 架构

kind 官方架构图如下,它将 docker 容器作为 kubernetes 的 “node”,并在该 “node” 中安装 kubernetes 组件,包括一个或者多个 Control Plane 和 一个或者多个 Work nodes。这就解决了在本机运行多个 node 的问题,而不需要虚拟化 (sysin)。

kind

3. 安装 Kind

(1)、安装 Docker,这是前提条件。

快速安装:sudo sh -c "$(curl -fsSL https://get.docker.com)"

(2)、安装 kubectl:Kind 本身不需要 kubectl,安装 kubectl 可以在本机直接管理 Kubernetes 群集。

  • Linux:

    1
    2
    3
    4
    curl -LO "https://dl.k8s.io/release/$(curl -L -s https://dl.k8s.io/release/stable.txt)/bin/linux/amd64/kubectl"
    sudo install -o root -g root -m 0755 kubectl /usr/local/bin/kubectl
    #验证版本
    kubectl version --client
  • macOS:

    1
    2
    3
    brew install kubectl
    #验证版本
    kubectl version --client

(3)、安装 kind:

查看版本:Github releases page

  • Linux:

    1
    2
    3
    4
    5
    curl -Lo ./kind https://kind.sigs.k8s.io/dl/v0.10.0/kind-linux-amd64
    chmod +x ./kind
    mv ./kind /usr/local/bin/kind
    #验证版本
    kind version
  • macOS (homebrew):

    1
    2
    3
    brew install kind
    #验证版本
    kind version

    或者

    1
    2
    3
    4
    5
    curl -Lo ./kind https://kind.sigs.k8s.io/dl/v0.10.0/kind-darwin-amd64
    chmod +x ./kind
    mv ./kind /usr/local/bin/kind
    #验证版本
    kind version

    如果安装了 VMware Fusion 12,在启动 vctl(vctl system start)之后,直接运行 vctl kind

  • Windows:可以支持,不推荐。

4. 操作入门

注意:以下命令基本上都需要 root 权限,非 root 用户请使用 sudo。

创建群集

创建一个默认群集:

1
kind create cluster

输出如下:

1
2
3
4
5
6
7
8
9
10
11
12
13
14
$ sudo kind create cluster
Creating cluster "kind" ...
✓ Ensuring node image (kindest/node:v1.20.2) 🖼
✓ Preparing nodes 📦
✓ Writing configuration 📜
✓ Starting control-plane 🕹️
✓ Installing CNI 🔌
✓ Installing StorageClass 💾
Set kubectl context to "kind-kind"
You can now use your cluster with:

kubectl cluster-info --context kind-kind

Not sure what to do next? 😅 Check out https://kind.sigs.k8s.io/docs/user/quick-start/

默认的群集名称为kind,可以使用参数--name指定创建的群集的名称,可以创建多个群集:

1
kind create cluster --name kind-2

指定 node 镜像版本创建群集 (sysin):

1
2
3
4
# default
kind create cluster --image kindest/node:latest
# 1.20.0
kind create cluster --image kindest/node:v1.20.0

多群集切换

获取群集名称,可以看到下面有两个群集:

1
2
3
kind get clusters
kind
kind2

切换群集:

1
2
3
4
# 切换到群集`kind`
kubectl cluster-info --context kind-kind
# 切换到群集`kind-2`
kubectl cluster-info --context kind-kind-2

可以通过 Kubernetes kubeconfig 配置文件来配置默认群集.

查看节点(默认只有一个 control-plane):

1
2
3
kubectl get nodes
NAME STATUS ROLES AGE VERSION
kind-control-plane Ready master 7m51s v1.20.2

删除群集

删除群集kind-2

1
kind delete cluster --name kind-2

将镜像加载到 kind 群集中

Kind 群集中的 Docker 镜像可以从互联网直接拉取,如果需要将本机镜像加载到 Kind 群集中,使用如下命令

kind load docker-image my-custom-image

kind load docker-image my-custom-image --name kind-2 (指定群集名称)

kind load image-archive /my-image-archive.tar (加载导出的镜像压缩包)

5. 配置 kind 群集

可以查看示例配置文件 kind-example-config,创建群集时使用 --config 参数:

1
kind create cluster --config kind-example-config.yaml

示例配置文件如下:

1
2
3
4
5
6
7
8
9
10
11
12
13
14
15
16
17
18
19
20
21
22
23
24
25
26
27
28
# this config file contains all config fields with comments
# NOTE: this is not a particularly useful config file
kind: Cluster
apiVersion: kind.x-k8s.io/v1alpha4
# patch the generated kubeadm config with some extra settings
kubeadmConfigPatches:
- |
apiVersion: kubelet.config.k8s.io/v1beta1
kind: KubeletConfiguration
evictionHard:
nodefs.available: "0%"
# patch it further using a JSON 6902 patch
kubeadmConfigPatchesJSON6902:
- group: kubeadm.k8s.io
version: v1beta2
kind: ClusterConfiguration
patch: |
- op: add
path: /apiServer/certSANs/-
value: my-hostname
# 1 control plane node and 3 workers
nodes:
# the control plane node config
- role: control-plane
# the three workers
- role: worker
- role: worker
- role: worker

Multi-node clusters

示例如下:

1
2
3
4
5
6
7
# three node (two workers) cluster config
kind: Cluster
apiVersion: kind.x-k8s.io/v1alpha4
nodes:
- role: control-plane
- role: worker
- role: worker

Control-plane HA

示例如下:

1
2
3
4
5
6
7
8
9
10
# a cluster with 3 control-plane nodes and 3 workers
kind: Cluster
apiVersion: kind.x-k8s.io/v1alpha4
nodes:
- role: control-plane
- role: worker
- role: worker
- role: worker

将 node 的端口映射到主机

可以通过extraPortMappings将 node 的端口映射到主机

1
2
3
4
5
6
7
8
9
kind: Cluster
apiVersion: kind.x-k8s.io/v1alpha4
nodes:
- role: control-plane
extraPortMappings:
- containerPort: 80
hostPort: 80
listenAddress: "0.0.0.0" # Optional, defaults to "0.0.0.0"
protocol: udp # Optional, defaults to tcp

指定 Kubernetes 的版本

可以通过设置 node 的容器镜像版本运行指定版本的 kubernetes 群集。可以在官方 release 页面中中查找需要镜像 tag,带上 sha256 shasum(非必须),例如:

1
2
3
4
5
6
7
kind: Cluster
apiVersion: kind.x-k8s.io/v1alpha4
nodes:
- role: control-plane
image: kindest/node:v1.18.15@sha256:5c1b980c4d0e0e8e7eb9f36f7df525d079a96169c8a8f20d8bd108c0d0889cc4
- role: worker
image: kindest/node:v1.18.15@sha256:5c1b980c4d0e0e8e7eb9f36f7df525d079a96169c8a8f20d8bd108c0d0889cc4

kind 0.10 支持的版本如下:

1
2
3
4
5
6
7
1.20: kindest/node:v1.20.2@sha256:8f7ea6e7642c0da54f04a7ee10431549c0257315b3a634f6ef2fecaaedb19bab
1.19: kindest/node:v1.19.7@sha256:a70639454e97a4b733f9d9b67e12c01f6b0297449d5b9cbbef87473458e26dca
1.18: kindest/node:v1.18.15@sha256:5c1b980c4d0e0e8e7eb9f36f7df525d079a96169c8a8f20d8bd108c0d0889cc4
1.17: kindest/node:v1.17.17@sha256:7b6369d27eee99c7a85c48ffd60e11412dc3f373658bc59b7f4d530b7056823e
1.16: kindest/node:v1.16.15@sha256:c10a63a5bda231c0a379bf91aebf8ad3c79146daca59db816fb963f731852a99
1.15: kindest/node:v1.15.12@sha256:67181f94f0b3072fb56509107b380e38c55e23bf60e6f052fbd8052d26052fb5
1.14: kindest/node:v1.14.10@sha256:3fbed72bcac108055e46e7b4091eb6858ad628ec51bf693c21f5ec34578f6180

IPv6 clusters

kind目前支持 IPv6 单栈群集,前提是运行 Docker 的主机支持 IPv6,双栈支持即将到来, 大多数操作系统/发行版支持 IPv6,Linux 上通过以下命令查看:

1
sudo sysctl net.ipv6.conf.all.disable_ipv6

显示如下,表明主机启用了 IPv6:

1
net.ipv6.conf.all.disable_ipv6 = 0

如果 Docker 运行在 Windows 或者 Mac 上,IPv6 端口转发不起作用,需要指定 API Server 使用 IPv4 端口转发:

1
2
3
4
5
6
# an ipv6 cluster
kind: Cluster
apiVersion: kind.x-k8s.io/v1alpha4
networking:
ipFamily: ipv6
apiServerAddress: 127.0.0.1

在 Linux 上只需要这样:

1
2
3
4
5
# an ipv6 cluster
kind: Cluster
apiVersion: kind.x-k8s.io/v1alpha4
networking:
ipFamily: ipv6

导出 Cluster 日志

从默认 cluster (名称为 kind)导出日志:

1
2
kind export logs
Exported logs to: /tmp/396758314

切换群集加上 --name 参数。

默认日志导出到 /tmp 目录下,可以指定导出的目录,例如:

1
2
kind export logs ./somedir
Exported logs to: ./somedir

日志文件结构如下:

1
2
3
4
5
6
7
8
9
10
.
├── docker-info.txt
└── kind-control-plane/
├── containers
├── docker.log
├── inspect.json
├── journal.log
├── kubelet.log
├── kubernetes-version.txt
└── pods/

6. 配置概述

6.1 入门

在创建 Kind 群集时,需要通过一个 YAML 配置文件来自定义群集配置。

一个最小化的配置如下:

1
2
kind: Cluster
apiVersion: kind.x-k8s.io/v1alpha4

将配置文件保存为 config.yaml,通过运行命令 kind create cluster --config=config.yaml 来创建群集。

6.2 Cluster-Wide 选项

以下全局选项可用,并非所有的选项列入文档,可以关注官网文档的更新。

Networking

关于网络的配置选项。

IP Family

IPv6 (and soon dual-stack!) clusters:

1
2
3
4
kind: Cluster
apiVersion: kind.x-k8s.io/v1alpha4
networking:
ipFamily: ipv6

上节 “IPv6 Clusters” 中有更详细的描述。

API Server

自定义 API Server 侦听地址和端口:

1
2
3
4
5
6
7
8
9
10
kind: Cluster
apiVersion: kind.x-k8s.io/v1alpha4
networking:
# WARNING: It is _strongly_ recommended that you keep this the default
# (127.0.0.1) for security reasons. However it is possible to change this.
apiServerAddress: "127.0.0.1"
# By default the API server listens on a random open port.
# You may choose a specific port but probably don't need to in most cases.
# Using a random port makes it easier to spin up multiple clusters.
apiServerPort: 6443
Pod Subnet

自定义 pod IP 地址范围:

1
2
3
4
kind: Cluster
apiVersion: kind.x-k8s.io/v1alpha4
networking:
podSubnet: "10.244.0.0/16"
Service Subnet

自定义 service IP 地址范围:

1
2
3
4
kind: Cluster
apiVersion: kind.x-k8s.io/v1alpha4
networking:
serviceSubnet: "10.96.0.0/12"
禁用默认 CNI

KIND 附带了一个简单的网络实现(“kindnetd”),它基于标准 CNI 插件(ptphost local,…)和简单的 netlink 路由。

这个 CNI 也处理 IP 伪装。

您可以禁用默认值以安装其他 CNI。这是一个高级用户功能,支持有限,但已知许多常见的 CNI 清单可以工作,例如 Calico。

1
2
3
4
5
kind: Cluster
apiVersion: kind.x-k8s.io/v1alpha4
networking:
# the default CNI will not be installed
disableDefaultCNI: true
kube-proxy mode

kube-proxy mode 可选 iptables 和 ipvs,默认使用的 iptables。

1
2
3
4
kind: Cluster
apiVersion: kind.x-k8s.io/v1alpha4
networking:
kubeProxyMode: "ipvs"

Nodes

kind: Clusternodes 字段如果不设置,默认时这样的(即仅有一个 control plane):

1
2
3
nodes:
# one node hosting a control plane
- role: control-plane

多节点群集示例如下:

1
2
3
4
5
6
7
8
9
10
11
12
13
14
15
16
17
kind: Cluster
apiVersion: kind.x-k8s.io/v1alpha4
# One control plane node and three "workers".
#
# While these will not add more real compute capacity and
# have limited isolation, this can be useful for testing
# rolling updates etc.
#
# The API-server and other control plane components will be
# on the control-plane node.
#
# You probably don't need this unless you are testing Kubernetes itself.
nodes:
- role: control-plane
- role: worker
- role: worker
- role: worker

可以通过设置 node 的容器镜像版本运行指定版本的 kubernetes 群集。可以在官方 release 页面中中查找需要镜像 tag,带上 sha256 shasum,例如:

1
2
3
4
5
6
kind: Cluster
apiVersion: kind.x-k8s.io/v1alpha4
nodes:
- role: control-plane
- role: worker
image: kindest/node:v1.16.4@sha256:b91a2c2317a000f3a783489dfb755064177dbc3a0b2f4147d50f04825d016f55

6.3 Per-Node 选项

以下选项适用于 nodes,并非所有的选项列入文档,可以关注官网文档的更新。

Extra Mounts

附加挂载可以用来将主机上的存储挂载到 Node 上,用于持久保存数据。

1
2
3
4
5
6
7
8
kind: Cluster
apiVersion: kind.x-k8s.io/v1alpha4
nodes:
- role: control-plane
# add a mount from /path/to/my/files on the host to /files on the node
extraMounts:
- hostPath: /path/to/my/files/
containerPath: /files

Extra Port Mappings

附加端口映射可以将端口转发到 Kind 节点。这是一个跨平台的选项,可以将流量引入 Kind 群集。

使用 Linux 上的 docker,您可以简单地将流量从主机发送到节点 IP,但要在 macOS 和 Windows,您需要使用这些设置才能实现。

另外也可以使用 ingress 转发流量。

1
2
3
4
5
6
7
8
9
10
11
12
13
14
kind: Cluster
apiVersion: kind.x-k8s.io/v1alpha4
nodes:
- role: control-plane
# port forward 80 on the host to 80 on this node
extraPortMappings:
- containerPort: 80
hostPort: 80
# optional: set the bind address on the host
# 0.0.0.0 is the current default
listenAddress: "127.0.0.1"
# optional: set the protocol to one of TCP, UDP, SCTP.
# TCP is the default
protocol: TCP

Kubeadm Config Patches

KIND 使用 kubeadm 配置群集节点。

KIND 在第一个控制平面节点上运行“kubeadm init”,该节点可以使用 kubeadm InitConfiguration (spec) 进行自定义配置。

1
2
3
4
5
6
7
8
9
10
kind: Cluster
apiVersion: kind.x-k8s.io/v1alpha4
nodes:
- role: control-plane
kubeadmConfigPatches:
- |
kind: InitConfiguration
nodeRegistration:
kubeletExtraArgs:
node-labels: "my-label=true"

在 KIND 群集其他节点配置中,包括 worker 或者 control-plane (in HA mode), KIND 运行 kubeadm join 命令参数,可以通过 JoinConfiguration (spec) 进行自定义配置。

1
2
3
4
5
6
7
8
9
10
11
12
13
14
15
16
17
18
19
kind: Cluster
apiVersion: kind.x-k8s.io/v1alpha4
nodes:
- role: control-plane
- role: worker
- role: worker
kubeadmConfigPatches:
- |
kind: JoinConfiguration
nodeRegistration:
kubeletExtraArgs:
node-labels: "my-label2=true"
- role: control-plane
kubeadmConfigPatches:
- |
kind: JoinConfiguration
nodeRegistration:
kubeletExtraArgs:
node-labels: "my-label3=true"

7. 部署 Dashboard

直接部署 Dashboard,运行命令:

1
kubectl apply -f https://raw.githubusercontent.com/kubernetes/dashboard/v2.0.0/aio/deploy/recommended.yaml

验证:

1
2
3
4
5
6
7
8
kubectl get po,svc -n kubernetes-dashboard
NAME READY STATUS RESTARTS AGE
pod/dashboard-metrics-scraper-7b59f7d4df-f7j7h 1/1 Running 0 90s
pod/kubernetes-dashboard-74d688b6bc-s9wts 1/1 Running 0 89s

NAME TYPE CLUSTER-IP EXTERNAL-IP PORT(S) AGE
service/dashboard-metrics-scraper ClusterIP 10.96.228.22 <none> 8000/TCP 90s
service/kubernetes-dashboard ClusterIP 10.96.160.22 <none> 443/TCP 91s

创建 ClusterRoleBinding 获得群集 admin 访问权限:

1
2
3
kubectl create clusterrolebinding default-admin --clusterrole cluster-admin --serviceaccount=default:default
#提示:
clusterrolebinding.rbac.authorization.k8s.io/default-admin created

创建登录 Dashboard 的 token:

1
token=$(kubectl get secrets -o jsonpath="{.items[?(@.metadata.annotations['kubernetes\.io/service-account\.name']=='default')].data.token}"|base64 --decode)

使用 echo 显示 token:

1
echo $token

记得保存一下 token

1
2
echo $token > dashboard-token.txt
cat dashboard-token.txt

使用 kubectl 命令访问 Dashboard,命令如下:

1
2
3
kubectl proxy

Starting to serve on 127.0.0.1:8001

点击 Kubernetes Dashboard 使用上述 token 登录 Dashboard

也可以通过 ingress 来访问 Dashboard。

8. 部署 ingress

在创建群集时,需要使用 KIND 的 extraPortMapping 配置选项将端口从主机转发到运行在节点上的入口控制器。

然后部署一个 Ingress controller,已知以下几个 ingress controllers 可以支持 kind:

这里以 ingress-nginx 为例:

创建一个群集

使用 extraPortMappings 和 node-labels 配置选项创建一个群集。

  • extraPortMappings 允许本地主机转发请求到 Ingress controller 的 80/443 端口
  • node-labels 允许 ingress controller 运行在指定的 node 上
1
2
3
4
5
6
7
8
9
10
11
12
13
14
15
16
17
18
19
20
21
cat <<EOF | kind create cluster --config=-
kind: Cluster
apiVersion: kind.x-k8s.io/v1alpha4
nodes:
- role: control-plane
kubeadmConfigPatches:
- |
kind: InitConfiguration
nodeRegistration:
kubeletExtraArgs:
node-labels: "ingress-ready=true"
extraPortMappings:
- containerPort: 80
hostPort: 80
protocol: TCP
- containerPort: 443
hostPort: 443
protocol: TCP
- role: worker
- role: worker
EOF

Ingress NGINX

1
2
wget -O kind-ingress-nginx.yaml https://raw.githubusercontent.com/kubernetes/ingress-nginx/master/deploy/static/provider/kind/deploy.yaml
kubectl apply -f kind-ingress-nginx.yaml

注意:image 来自 k8s.gcr.io,需要文明访问。

1
2
#image: k8s.gcr.io/ingress-nginx/controller:v0.35.0@sha256:fc4979d8b8443a831c9789b5155cded454cb7de737a8b727bc2ba0106d2eae8b
image: scofield/ingress-nginx-controller:v0.35.0

执行如下命令等待部署完成:

1
2
3
4
kubectl wait --namespace ingress-nginx \
--for=condition=ready pod \
--selector=app.kubernetes.io/component=controller \
--timeout=90s

或者执行命令验证部署:

1
2
kubectl get po,svc -n ingress-nginx
kubectl get po,svc -n ingress-nginx -o wide

测试 Ingress

使用官方提供的 http-echo 应用来测试,内容如下:

1
2
3
4
5
6
7
8
9
10
11
12
13
14
15
16
17
18
19
20
21
22
23
24
25
26
27
28
29
30
31
32
33
34
35
36
37
38
39
40
41
42
43
44
45
46
47
48
49
50
51
52
53
54
55
56
57
58
59
60
61
62
63
64
65
kind: Pod
apiVersion: v1
metadata:
name: foo-app
labels:
app: foo
spec:
containers:
- name: foo-app
image: hashicorp/http-echo:0.2.3
args:
- "-text=foo"
---
kind: Service
apiVersion: v1
metadata:
name: foo-service
spec:
selector:
app: foo
ports:
# Default port used by the image
- port: 5678
---
kind: Pod
apiVersion: v1
metadata:
name: bar-app
labels:
app: bar
spec:
containers:
- name: bar-app
image: hashicorp/http-echo:0.2.3
args:
- "-text=bar"
---
kind: Service
apiVersion: v1
metadata:
name: bar-service
spec:
selector:
app: bar
ports:
# Default port used by the image
- port: 5678
---
apiVersion: networking.k8s.io/v1beta1
kind: Ingress
metadata:
name: example-ingress
spec:
rules:
- http:
paths:
- path: /foo
backend:
serviceName: foo-service
servicePort: 5678
- path: /bar
backend:
serviceName: bar-service
servicePort: 5678
---

直接应用:

1
kubectl apply -f https://kind.sigs.k8s.io/examples/ingress/usage.yaml

测试效果如下:

1
2
3
4
# should output "foo"
curl localhost/foo
# should output "bar"
curl localhost/bar

ingress dashboard

本例使用受信任的 SSL 证书,通过 ingress 以 https 发布 Dashboard。

部署受信任的 SSL 证书

1
2
3
4
5
6
7
# 创建 secret,在 ingress 不能直接使用证书需要转换为 secret 才能使用
# key 和 cert 都为 PEM 格式,cert 包含证书文件和证书链部分
kubectl create secret tls dashboard-ingress-tls --key dashboard-ingress.key --cert dashboard-ingress.crt -n kubernetes-dashboard
# 查看 secret 内容
kubectl get secret dashboard-ingress-tls -n kubernetes-dashboard -o yaml
# 删除命令
kubectl delete secret dashboard-ingress-tls -n kubernetes-dashboard

配置 ingress 转发文件

1
2
3
4
5
6
7
8
9
10
11
12
13
14
15
16
17
18
19
20
# vi dashboard-ingress.yaml
apiVersion: extensions/v1beta1
kind: Ingress
metadata:
annotations:
nginx.ingress.kubernetes.io/ingress.class: "nginx"
nginx.ingress.kubernetes.io/backend-protocol: "HTTPS"
name: kubernetes-dashboard-ingress
namespace: kubernetes-dashboard
spec:
tls:
- secretName: dashboard-ingress-tls #上述创建的secret
rules:
- host: k8s.sysin.org #域名
http:
paths:
- path: /
backend:
serviceName: kubernetes-dashboard
servicePort: 443

host: 对应的域名
path: url上下文
backend: 后向转发到对应的 serviceName: 和 servicePort:

注意,dashboard 默认使用 https 提供服务,ingress 默认 backend-protocol 使用 http,这里发布成功的关键是要添加 annotations 参数:

1
2
3
annotations:
nginx.ingress.kubernetes.io/ingress.class: "nginx"
nginx.ingress.kubernetes.io/backend-protocol: "HTTPS"

部署:

1
kubectl apply -f dashboard-ingress.yaml

部署成功后可以通过域名访问:https://k8s.sysin.org

9. Istio

准备群集:

1
2
3
4
5
6
7
8
9
10
11
12
13
14
15
16
17
18
19
20
21
22
23
24
25
26
27
28
29
30
31
32
cat <<EOF | kind create cluster --config=-
apiVersion: kind.x-k8s.io/v1alpha4
kind: Cluster
networking:
apiServerAddress: "127.0.0.1"
apiServerPort: 6443
podSubnet: "10.218.0.0/16" #default: "10.244.0.0/16"
serviceSubnet: "10.1.0.0/16" #default: "10.96.0.0/12"
#disableDefaultCNI: true
nodes:
- role: control-plane
image: kindest/node:latest
kubeadmConfigPatches:
- |
kind: InitConfiguration
nodeRegistration:
kubeletExtraArgs:
node-labels: "ingress-ready=true"
extraPortMappings:
- containerPort: 30000
hostPort: 80
listenAddress: "127.0.0.1"
protocol: TCP
- containerPort: 30001
hostPort: 443
listenAddress: "127.0.0.1"
protocol: TCP
- containerPort: 30002
hostPort: 15021
listenAddress: "127.0.0.1"
protocol: TCP
EOF

继续

1
2
3
4
5
6
7
8
# Calico
curl https://docs.projectcalico.org/manifests/calico.yaml | kubectl apply -f -
# CoreDNS
kubectl scale deployment --replicas 1 coredns --namespace kube-system
# Metrics Server
helm repo add stable https://kubernetes-charts.storage.googleapis.com
helm repo update
helm upgrade metrics-server --install --set "args={--kubelet-insecure-tls, --kubelet-preferred-address-types=InternalIP}" stable/metrics-server --namespace kube-system

下载当前版本 istio:

1
curl -L https://istio.io/downloadIstio | sh -

下载指定版本 istio:

1
curl -L https://istio.io/downloadIstio | ISTIO_VERSION=1.8.0 TARGET_ARCH=x86_64 sh -

切换到 istio 目录,这里是 `istio-1.8.0:

1
cd istio-1.8.0

添加 istioctl 到环境变量 (Linux or macOS):

1
export PATH=$PWD/bin:$PATH

默认安装:

例如使用 demo configuration profile 安装

1
2
3
4
5
6
7
istioctl install --set profile=demo

✔ Istio core installed
✔ Istiod installed
✔ Egress gateways installed
✔ Ingress gateways installed
✔ Installation complete

由于 kind 的特殊性,需要特定的配置文件来运行 Istio。

定制安装:

创建配置文件:istio-demo-kind.yaml

对于 istiod 组件,将 HPA maxReplicas 设置为 1,以保证有足够的备用容量来处理工作负载。

然后需要使用 overlay 覆盖 PodDisruptionBudget 并将其设置为 0。否则,由于不满足 PodDisruptionBudget,Istio 升级将不会成功。

此外,指定一个 nodeSelector,以确保在 Kind 多节点群集的情况下,Istio 入口网关始终在特定节点上运行。

默认情况下,入口网关使用服务类型 LoadBalancer,该服务类型在 Kind 上不起作用,因为缺少 SLB(软件负载平衡器)实现。

因此,我们必须切换到 NodePort 类型,以在 localhost / 主机接口上暴露 ingress gateway。

1
2
3
4
5
6
7
8
9
10
11
12
13
14
15
16
17
18
19
20
21
22
23
24
25
26
27
28
29
30
31
32
33
34
35
36
37
38
39
40
41
42
43
44
45
46
47
48
49
50
51
52
53
54
55
56
57
58
59
60
61
62
63
64
65
66
67
68
69
70
71
72
73
74
75
76
77
apiVersion: install.istio.io/v1alpha1
kind: IstioOperator
spec:
addonComponents:
grafana:
enabled: true
kiali:
enabled: true
prometheus:
enabled: true
components:
base:
enabled: true
cni:
enabled: true
ingressGateways:
- enabled: true
k8s:
hpaSpec:
maxReplicas: 1
nodeSelector:
ingress-ready: "true"
service:
type: NodePort
overlays:
- apiVersion: v1
kind: Service
name: istio-ingressgateway
patches:
- path: spec.ports
value:
- name: status-port
port: 15021
targetPort: 15021
nodePort: 30002
- name: http2
port: 80
targetPort: 8080
nodePort: 30000
- name: https
port: 443
targetPort: 8443
nodePort: 30001
- apiVersion: policy/v1beta1
kind: PodDisruptionBudget
name: istio-ingressgateway
patches:
- path: spec.minAvailable
value: 0
pilot:
enabled: true
k8s:
hpaSpec:
maxReplicas: 1
overlays:
- apiVersion: policy/v1beta1
kind: PodDisruptionBudget
name: istiod
patches:
- path: spec.minAvailable
value: 0
meshConfig:
accessLogFile: "/dev/stdout"
accessLogEncoding: "JSON"
values:
global:
controlPlaneSecurityEnabled: true
cni:
excludeNamespaces:
- istio-system
- kube-system
gateways:
istio-ingressgateway:
sds:
enabled: true
sidecarInjectorWebhook:
rewriteAppHTTPProbe: true

安装:

1
istioctl install -f istio-demo-kind.yaml

限于篇幅和 Istio 的复杂度,后续考虑用单独文章描述该内容。

10. 限制

kind 部署 kubernetes 群集相当方便,可以快速部署多个群集。但在群集的配置和更新上有明显弊端,只能通过重新创建群集来配置和更新群集。所以在初始化群集的时候需要考虑好配置选项。当然我们只是用于测试环境,也无大碍。

11. 云主机推荐

阿里云 云服务器新用户专享 1核2G ¥96.90/年起(具体活动可能有所变动,官网显示为准)

阿里云促销


【腾讯云】云产品限时秒杀,爆款1核2G云服务器,首年99元(具体活动可能有所变动,官网显示为准)

腾讯云秒杀


使用体验:

  • 在 CPU、内存和磁盘性能上两家并无明显体验差别。
  • 在带宽上,最低都是 1Mbps,根据官方说明不足 10Mbps 的带宽,入站带宽都是10Mbps,出站带宽是实际购买带宽(个人使用一台腾讯云,下载带宽可大 100Mbps)。

两家有什么区别?

  • 阿里云详细规则页面有提示不支持退订,但可以特殊申请退订。腾讯云上述产品不满意可以直接退款。

  • 阿里云基于个人身份识别(比如身份证),一个身份限购一台,新注册账号无效,腾讯云基于账号识别,一个身份可以新注册账号另外在购买一台。


捐助本站 ❤️ Donate

点击访问官方网站


文章用于推荐和分享优秀的软件产品及其相关技术,所有软件默认提供官方原版(免费版或试用版),免费分享。对于部分产品笔者加入了自己的理解和分析,方便学习和测试使用。任何内容若侵犯了您的版权,请联系作者删除。如果您喜欢这篇文章或者觉得它对您有所帮助,或者发现有不当之处,欢迎您发表评论,也欢迎您分享这个网站,或者赞赏一下作者,谢谢!

支付宝赞赏 微信赞赏

赞赏一下


☑️ 评论恢复,欢迎留言❗️
敬请注册!点击 “登录” - “用户注册”(已知不支持 21.cn/189.cn 邮箱)。请勿使用联合登录(已关闭)